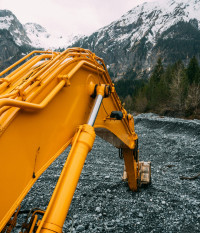
User account menu

  • Log in
Home Next Engineers
  • About
    • Our Program
    • Our Leadership
    • Volunteer
    • What Do Engineers Do?
    • Engineering by the Numbers
    • FAQs
    Building a better world
    We are increasing the number of engineering innovators and leaders who will make what’s next for the world even better.
    Group of students
  • Programs
    • Engineering Academy
    • Engineering Camp
    • Engineering Discovery
    • Engineering at Home
    Driving change
    Inspiring the next generation of engineers to build a more creative, innovative, sustainable world.
    Engineering students
  • Locations
    • Cincinnati, OH
    • Greenville, SC
    • Johannesburg, S.A.
    • Staffordshire, U.K.
    • Warsaw, Poland
    • Global Discovery
    GE businesses around the world are inspiring young minds
    Find city profiles, activities and how to join.
    Aim high
  • News
    Latest news & updates
    Read all news, updates, and happenings from the Next Engineers initiative.
    A group of students and teacher
  • Log in

Main navigation

  • About
    • Our Program
    • Our Leadership
    • Volunteer
    • What Do Engineers Do?
    • Engineering by the Numbers
    • FAQs
  • Programs
    • Engineering Academy
    • Engineering Camp
    • Engineering Discovery
    • Engineering at Home
  • Locations
    • Cincinnati, OH
    • Greenville, SC
    • Johannesburg, S.A.
    • Staffordshire, U.K.
    • Warsaw, Poland
    • Global Discovery
  • News
  • Log in

Cities navigation

GE businesses around the world are inspiring young minds
Find city profiles, activities and how to join.
Aim high

Inspiration navigation

Driving change
Inspiring the next generation of engineers to build a more creative, innovative, sustainable world.
Engineering students

News navigation

Latest news & updates
Read all news, updates, and happenings from the Next Engineers initiative.
A group of students and teacher

Resources navigation

Explore all resources
Find the tools that you need to run a successful Next Engineers program, including communication collateral and templates, student and volunteer outreach materials, student activity guides, engineering challenges, and Monitoring & Evaluation resources.
Two male engineering students at a table in a classroom smiling. Photo by Jeswin Thomas on Unsplash.
Building a better world
We are increasing the number of engineering innovators and leaders who will make what’s next for the world even better.
Group of students
Challenge Yourself
Find activity guides and resources to help you as students, parents, and teachers stay curious and build worlds that haven't even been thought of yet.
Challenge yourself
Measuring Impact
Partners and volunteers can explore real-time data on each Next Engineers program to see the difference they’re making in their communities.
Facilitator Amber showing the whitebaord
DIY pattern
  • DIY
Under Pressure
Experiment & Explore
Ages Cost Time
14+ Medium About 60 minutes
PDF Download
Introduction
Introduction

What if I told you that I can crush a rock or lift a car with my just my finger? You might think I’m Superman. You would probably think I’m crazy! But it’s true, and you can too. That’s the power of science, engineering, and hydraulics.
 

In this Experiment and Explore activity, you will discover the awesome power of hydraulics and explore ways engineers put this to work to solve real-world problems. 

important-tip primary
Top Tip

You may want some towels on hand to clean up any leaks during this experiment!

What to do
What to do

You are going to conduct two separate but related experiments.

Experiment 1: 

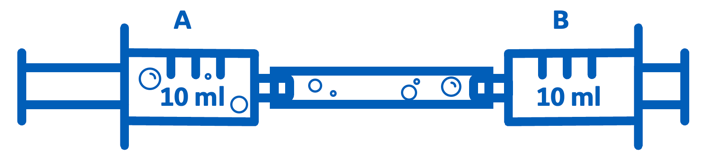
  1. Connect the two 10 ml syringes (one with its plunger drawn out, the other pushed in) with the flexible tube. We will call the syringe with its plunger pulled out, A and the other syringe, B.

    graphic
  2. If you push plunger A in, what do you think will happen to plunger B. Why is this?
  3. Push plunger A in. Were your predictions correct? Did both plungers travel the same distance? What do you think happened to the force you applied to plunger A?
  4. Now what do you think will happen if you push plunger B (the plunger that moved out) back in, but this time use your hand to stop plunger A from moving. Why?
  5. Push plunger B in while using your hand to stop plunger A from moving out. Were your predictions correct? How easy was it for you to push plunger B in and stop plunger A from moving out? Why do you think this is? What happened to the force you applied?
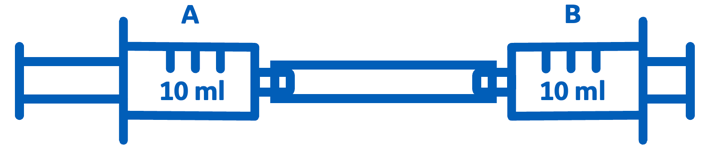
  6. Next, disconnect the syringes so that syringe A still has the tube connected to 
    it. Fill syringe A and the tube with water. Push the plunger of syringe B all the 
    way in again and reconnect it to the tube.                                                                              

    graphic
  7. If you push plunger A in, what do you think will happen to plunger B. Why is 
    this?
  8. Push plunger A in. Were your predictions correct? Did both plungers travel the same distance? What happened to the force you applied to plunger A?
  9. Now what do you think will happen if you push plunger B (the plunger that moved out) back in, but this time use your hand to stop plunger A from moving out. Why?
  10. Push plunger B in while using your hand to stop plunger A moving. Were 
    your predictions correct? How easy was it for you to push plunger B in and 
    stop plunger A from moving out? Why do you think this is? What happened to 
    the force you applied?


What you will need
What you will need

For Experiment 1, you'll need the following materials.

  • Two 10 ml syringes
  • A 20 ml syringe
  • About 15 cm (6 in) of flexible tube that fits tightly onto the end of the syringes
    (like the kind often used in aquariums or irrigation systems – a diameter of 
    about 5 mm (0.2 in) usually works well – e.g. https://www.amazon.com/Assortment-2mm-3mm-4mm-5mm/dp/B0CC312XMC/)
  • Water
  • A ruler


You will also need the following items to do some additional investigations.

  • Two or three more 20 ml syringes
  • A 50 ml syringe (optional but lots of fun)
  • An extra 1 m (40 in) of flexible tubing
  • Scissors
  • Two or three t-piece hose connectors that fit into the flexible tubing (e.g. 
    https://www.ebay.co.uk/itm/221222667280)
  • Some heavy objects like small rocks, a pack or sugar or tin cans of food
What to do

Experiment 2:

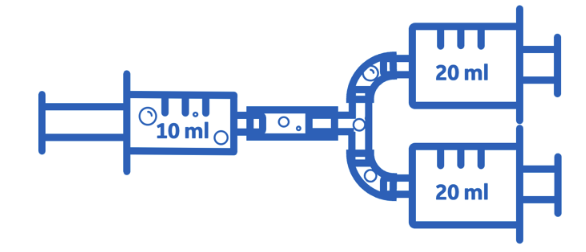
  1.  In this experiment we will swap out one of the 10 ml syringes with a 20 ml syringe. Disconnect the syringes so that one syringe still has the tube connected to it. Make sure this syringe and the tube are filled with water. Push the plunger of the 20 ml syringe all the way in and connect it to the tube.

    image
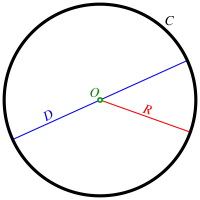
  2. A cross section is a thin slice across an object that lets you visualize the inside of that object or perform calculations. The shape of the object and the angle at which you take the slice determine the shape of the cross-section. Can you see that the cross-sectional area of the 20 ml syringe is larger than the 10 ml syringe?

    image
  3. What do you think will happen to the 20 ml plunger if you push the 10 ml plunger in. Will both plungers travel the same distance?
  4. Push the 10 ml plunger in to see if you are correct. Measure how far the 20 ml plunger travels for every 1 cm (0.4 in) the 10 ml plunger travels. How does this compare to your results from Experiment 1?
  5. What do you think will happen if you push the 20 ml plunger in? How far will the 10 ml plunger travel for every 1 cm (0.4 in) the 20 ml plunger travels? Try this to see if you are correct. How does this compare to the results from Experiment 1?
  6. Pull the 10 ml plunger out again. What do you think will happen if you push the 10 ml plunger in while using your hand to try and stop the 20ml plunger from moving out?
  7. Push the 10 ml plunger in to see if you are correct. Is it harder to stop the 20 ml plunger from moving than it was to stop the 10 ml plunger from moving in Experiment 1? Why do you think this is? What do you think is happening to the force you applied to the 10 ml plunger?
  8. Now what do you think will happen if you push the 20 ml plunger in while using your hand to try and stop the 10 ml plunger from moving out?
  9. Push the 20 ml plunger in. Is it harder to stop the 10 ml plunger from moving than it was to stop it from moving in Experiment 1? Why do you think this is? What do you think is happening to the force you applied to the 20 ml plunger?
important-tip primary
Cross-Sectional Area

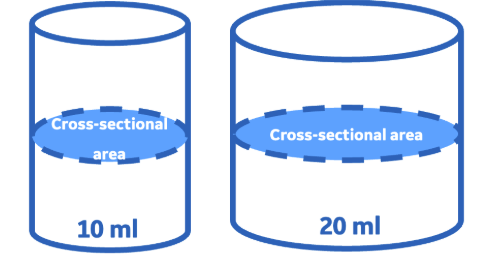
You can think of the cross-sectional area as the area of the shape that you would see after cutting an object into two pieces.

Cross Sectional Area

What's happening

In Experiment 1, we saw that if we pushed plunger A in, plunger B moved out when the syringes were filled with air (a gas) or water (a liquid). The force we applied to plunger A was transferred by the air or water to plunger B, making it move.

However, when we tried to stop plunger A from moving, when we pushed plunger B back in we discovered that the air in our syringes could be compressed or forced into a smaller volume (to a point). We were able to keep plunger A from moving quite easily. Most of the force we applied to push plunger B in went into compressing the air rather than moving plunger A out. In other words, very little force was transferred to plunger A.

But this was not the case when the syringes were filled with water. Water (like most other liquids) is incompressible. Very little of the force was ‘wasted’ on compressing the water, and almost all of it was transferred directly to plunger A from plunger B.

This phenomenon is called Pascal’s Principle (or Law). It states that in a confined incompressible fluid, (like water in a syringe) a pressure change in one part of the fluid is transmitted without loss to every other part of the fluid and to the walls of the container.

In Experiment 1, the syringes were the same size. In Experiment 2, they were different sizes. The 20 ml syringe had a larger cross-sectional area than the 10 ml syringe.

When we had two 10 ml syringes connected together, both syringes always moved the same distance and with the same force. However, when we connected a 20 ml syringe, we saw that the distance travelled by the 10 ml plunger was always greater than the distance travelled by the 20 ml plunger. This makes sense because the 20 ml syringe holds more water for each unit distance that the plunger moves.

We also discovered that it was much harder to stop the 20 ml plunger from moving than the 10 ml plunger. The force applied to the 10 ml plunger was multiplied at the 20 ml plunger.

It turns out that the force (F) applied to each plunger is related to the cross -sectional area (A) of the respective syringe as follows:

\[ 
\frac{\text{Cross-sectional area}_{10\,\text{ml}}}{\text{Cross-sectional area}_{20\,\text{ml}}} = \frac{\text{Force}_{10\,\text{ml}}}{\text{Force}_{20\,\text{ml}}} 
\]

Or

\[
\frac{\text{Force}_{10\,\text{ml}}}{\text{Cross-sectional area}_{10\,\text{ml}}} = \frac{\text{Force}_{20\,\text{ml}}}{\text{Cross-sectional area}_{20\,\text{ml}}} 
\]

This means that if we have two syringes, a green syringe (A) and an orange syringe (B), and if the cross-sectional area of syringe B is double that of syringe A, then the force applied to syringe B will also be double the force applied to syringe A. In other words, if you apply a force of 10 N at plunger A, we will get a force of 20 N applied at plunger B.  

image

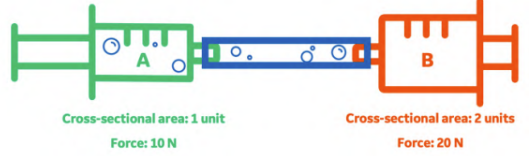
However, nothing is for free. What we gain in the force applied at plunger B is lost in the distance plunger B moves. If plunger A moves 10 cm, plunger B will only move half this distance, i.e., 5 cm.  

image

We can express this mathematically as:

\[
\frac{\text{Cross-sectional area}_{10\,\text{ml}}}{\text{Cross-sectional area}_{20\,\text{ml}}} = \frac{\text{Distance}_{20\,\text{ml}}}{\text{Distance}_{10\,\text{ml}}}
\]

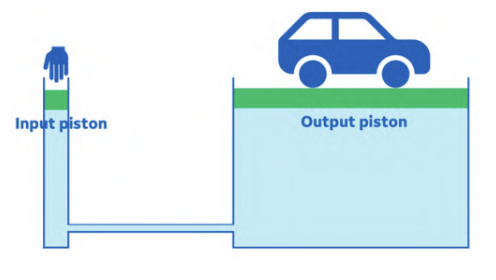
If the difference in the cross-sectional areas between two syringes or between any two cylinders with movable pistons is great enough, you can build a machine able to multiply the force you apply at the smaller piston (the input) that is great enough to crush a rock or lift a car at the bigger piston (the output). Such a system is called a hydraulic system.

image

Watch the video called How a hydraulic jack works (3D Animation | Pascal Principle) (3:19) to see a simple explanation of hydrostatic pressure and how this can be applied to allow us to lift very heavy objects or crush things (sometimes just for fun - TOP 100 ITEMS UNDER HYDRAULIC PRESS (14:12) 

Key terms
  • COMPRESSIBLE

    Able to be forced or squeezed into a smaller space or volume, at least to a point. Gasses are compressible.

  • INCOMPRESSIBLE

    Unable to be forced or squeezed into a smaller space or volume. Most liquids and solids are incompressible.

  • PASCAL'S PRINCIPLE

    In a confined incompressible fluid, a pressure change in one part of the fluid is transmitted without loss to every other part of the fluid and to the walls of the container. 

  • CROSS-SECTIONAL AREA

    The area of a 2D shape obtained by slicing through a 3D shape (like a cylinder) at a right angle.

  • NEWTONS

    We measure force applied (how hard something is pushed or pulled) in Newtons in honor of sir Isaac Newton. A force of 1 N is the force needed to lift up a 100 g bar of chocolate.

  • have a think primary
    Did you know?
    earth moving machine - photo by Gerold Hinzen

    Hydraulic systems are all around you. They are used in cranes and earthmoving machines, car steering and brakes, robots, forklifts, elevators, and even bicycle brakes.


    have a think primary
    Diameter

    The diameter is the distance from one side of a circle to another through the center. 

    circle diagram
    Learn More

    Watch these videos to learn even more about Hydraulic system and their uses. 

    Pascal's Law (5:19)


    WATCH NOW
    How do Hydraulic Brakes work: (3:51)


    WATCH NOW
    Types of Hydraulic Presses and how they work: (1:26)


    WATCH NOW
    Think about it

    Knowing what you now know about hydraulic systems and how to make one, try 
    these experiments yourself.

    1. Remove the plungers completely to measure the diameters of the 10 ml syringe plunger and the 20 ml syringe plunger. Remember that the diameter is the length from one side of a circle to the other passing through the center.
    2. Use these measurements to calculate the cross-sectional area of the inside of each syringe. If you need help with this, use the online calculator at https://www.omnicalculator.com/math/area-of-a-circle. What is the ratio between the cross-sectional area of each syringe? Or, what is
       

      \[
      \frac{A_{\text{input}}}{A_{\text{output}}} = \frac{A_{10\,\text{ml}}}{A_{20\,\text{ml}}}
      \]

      In other words, if the cross-sectional area of the 10 ml syringe is 679 mm2 and the cross-sectional area of the 20 ml syringe is 1207 mm2, then the ratio would be

      \[
      \frac{A_{10\,\text{ml}}}{A_{20\,\text{ml}}} = \frac{679\,\text{mm}^2}{1207\,\text{mm}^2} = 0.56 
      \]

    3. Make a simple hydraulic system with a 10 ml and 20 ml syringe. Make sure that the 10 ml syringe and tube is full of water before connecting the 20 ml syringe and that the 20 ml plunger is pushed all the way in.
    4. If you move the 10 ml plunger 2 cm (0.8 in) how far does the 20 ml plunger move? How does the ratio of these distances relate to the ratio of the syringes’ cross-sectional areas? In the example above where the ratio of the cross-sectional areas was 0.56, we would find that the 20 ml plunger would move. \[
      \frac{d_{\text{input}}}{d_{\text{output}}} = \frac{d_{10\,\text{ml}}}{d_{20\,\text{ml}}}
      \]
       
    5. Use what you know about the ratio of the cross-sectional areas of your syringes to calculate what force would be applied to the 20 ml plunger if a force of 15 N is applied to the 10 ml plunger. In the example above where the ratio of the cross-sectional areas was 0.56, we would find that the force applied to the 20 ml syringe would be \[
      \begin{align*} \frac{\text{Cross-sectional area}_{10\,\text{ml}}}{\text{Cross-sectional area}_{20\,\text{ml}}} &= \frac{\text{Force}_{10\,\text{ml}}}{\text{Force}_{20\,\text{ml}}} \\ \therefore \text{Force}_{20\,\text{ml}} &= \frac{F_{10\,\text{ml}}}{\text{ratio of cross-sectional areas}} \\ &= \frac{15\,\text{N}}{0.56} \\ &= 26.79\,\text{N} \end{align*} \]
       
    6. Now, use a t-piece hose connector to connect two 20 ml syringes (the output) to a single 10 ml syringe (the input) as shown below. As usual, make sure that the 10 ml syringe and all the tubes are full of water before connecting the 20 ml syringes and that the 20 ml plungers are pushed all the way in.

      image
    7. Calculate is the ratio of the cross-sectional area of the 10 ml syringe (the input) to both 20 ml syringes (the output)? In other words, what is \[
       \frac{A_{\text{input}}}{A_{\text{output}}} = \frac{A_{10\,\text{ml}}}{A_{20\,\text{ml}} + A_{20\,\text{ml}}} \]
       
    8. How do you think the addition of another 20 ml syringe to the output will affect the distance travelled by the 20 ml plungers for each unit distance travelled by the 10 ml plunger?
    9. Move the 10 ml a distance of 2 cm (0.8 in). How far do the 20 ml plungers move now? How does this compare to the case were there was only one 20 ml syringe connected? Why do you think this is the case?
    10. Use what you know about the ratio of the cross-sectional areas of the input (10 ml) syringe and the output (20 ml syringes) to calculate what force will be applied by the output (the two 20 ml plungers combined) if a force of 15 N is applied to the input 10 ml plunger.
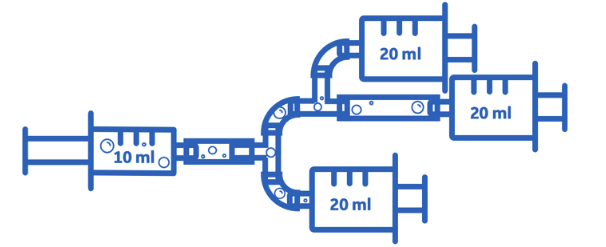
    11. Add another t-piece to your setup so that you can connect three 20 ml syringes (the output) to one 10 ml syringe (the input).

      image
    12. Calculate the ratio of the cross-sectional areas. \[
      \frac{A_{\text{input}}}{A_{\text{output}}} = \frac{A_{10\,\text{ml}}}{A_{20\,\text{ml}} + A_{20\,\text{ml}} + A_{20\,\text{ml}}} \]
       
    13. Experiment with how the increase in the output cross-sectional area (the three 20 ml syringes) affects the distance travelled by the 20 ml plungers for each unit distance travelled by the input 10 ml plunger.
    14. If a force of 15 N is applied to the input 10 ml plunger, what force would you expect to be applied to the output (the three 20 ml plungers combined).
    15. If you have one, add a 50 ml syringe into the mix. First, connect it to a 10 ml syringe and then use the t-pieces to add some 20 ml syringes. What combination will give you the maximum output force? Why is this?
    16. Take some time to construct your own hydraulic lift or press. There are many resources available on the internet for you to refer to. How great a mass do you think you could lift with your system?
    In the Real World

    Syringe hydraulic systems are fun to play with, but do you think we can use hydraulic systems to solve real-world problems? Consider these possibilities.

    How might you use a hydraulic system to open and close a heavy door?

     How might you use a hydraulic system to help us recycle?

    How else might you engineer a use for hydraulic system to solve a real-world problem?

    Share your ideas at #nextengineersdiy


    See All Activities
    Connect

    Want to know more or how to get involved? Are you an aspiring engineer or do you know one? We want to hear from you. Send us your questions and follow us on social media:

    Contact us: NextEngineers@fhi360.org

    Follow GE Aerospace
    Instagram LinkedIn X YouTube

    Follow GE VERNOVA
    Instagram LinkedIn X YouTube
    A groups of students

    Footer menu

    • Home
    • About
    • Inspiration
    • Cities
    • News

    Footer secondary

    • Terms of use
    • Privacy Policy
    • Cookie Policy
    • Research Study Notice
    • Next Engineers Privacy Notice
    • GE Aerospace
    • GE Vernova
    © 2025 FHI360